
Build a Payroll App with Salsa Express
Quickly launch payroll with prebuilt, embeddable UI elements and easy to use APIs.
Salsa Express is the fastest and easiest way to provide payroll services to your customers. With a combination of embeddable UI elements and simple to use APIs, you can launch payroll within days. In this tutorial, you'll build a sample application using Salsa Express, and learn how to:
- Embed UI elements in an application
- Set up an Employer and Workers
- Send compensation data from the application to Salsa
When finished, you'll be able to run payroll and view existing payroll runs, including payment records for each worker.
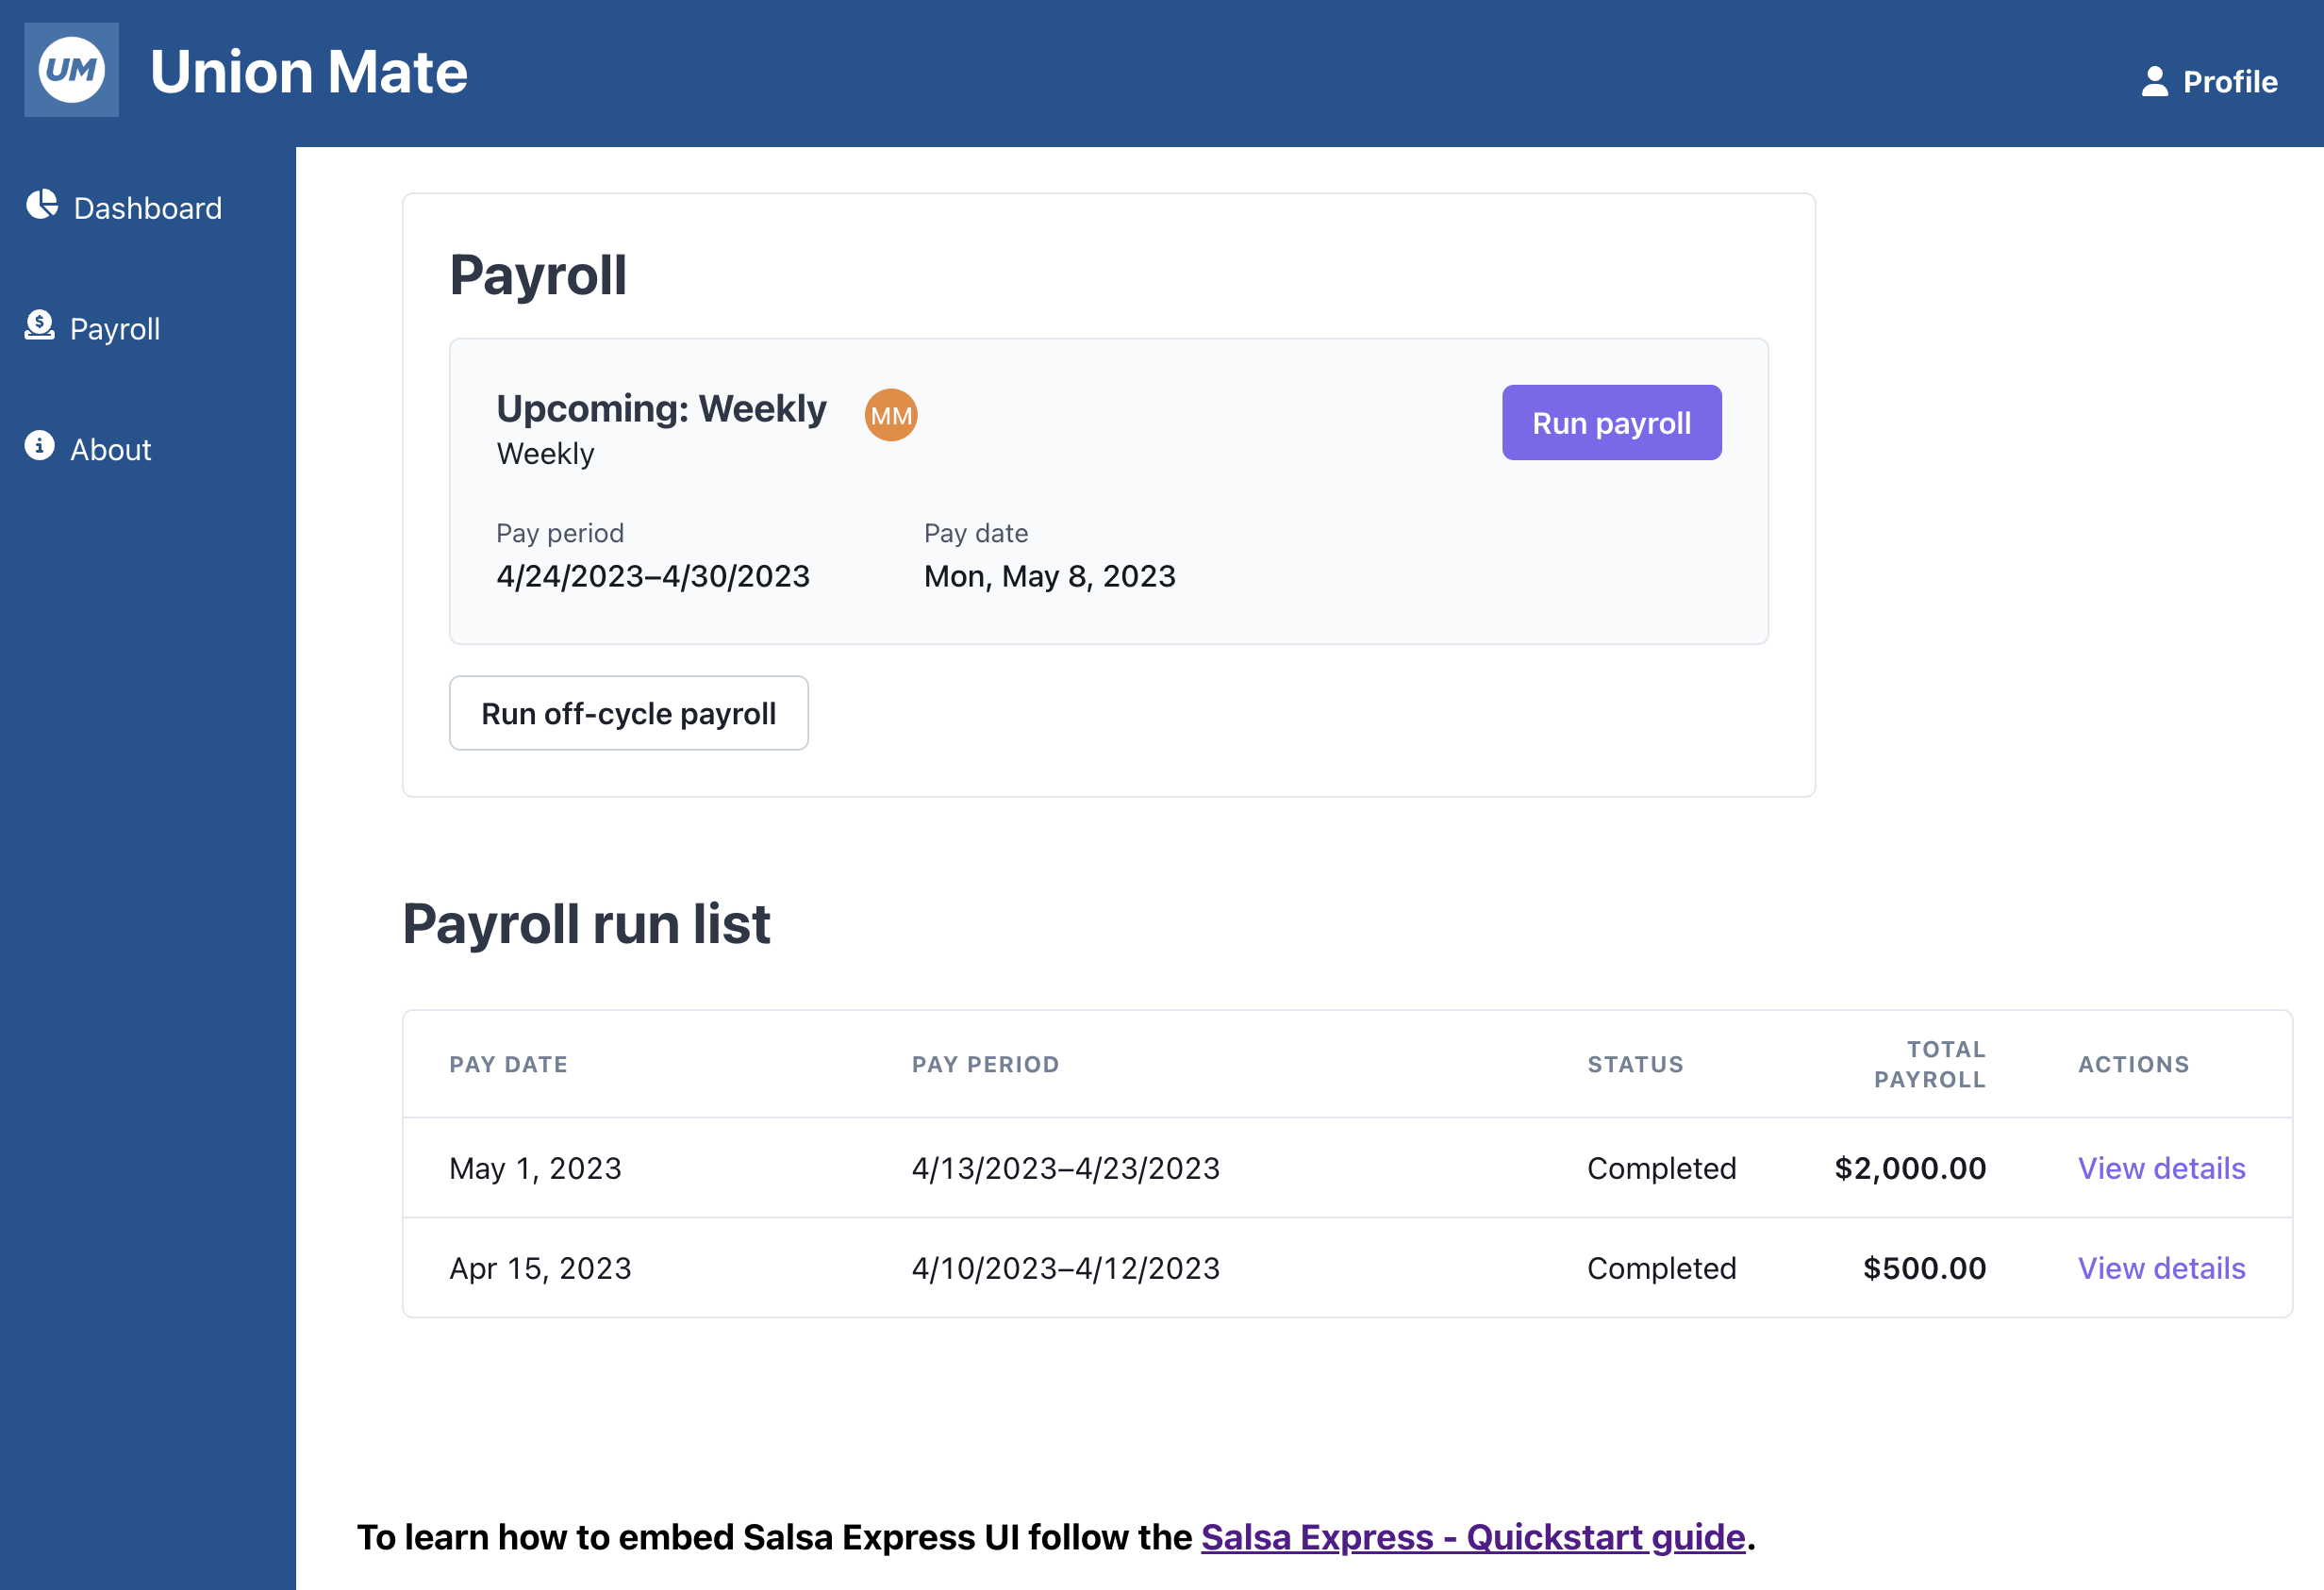
Employer dashboard embedded in sample app
In a rush?If you'd like to skip ahead, and run the completed app, the code is available on GitHub.
Step 1: Get an API Token
Before you continue, you need an API token. If you don't have one, get in touch with us.
After signing up, you receive two API keys. One for production and one for your sandbox environment. In this tutorial, you need your SandboxAPI Token . To learn more, see Authorization.
Step 2: Download the sample app and create a UI element
UI Elements are added to an application with our browser library, Salsa.js. Elements are rendered in an iframe and customizable for your use case. In this section, you'll download the sample app, create an element, and render it in your app.
Run the sample app
Follow these steps to download and run the sample app:
- Clone the sample app repository:
git clone https://github.com/salsa-payroll/Example-Frontend-App-Integration.git. - Run
npm install. - Run
npm start. - From a browser, navigate to
https://localhost:3000/.
You should now see a basic web app with a tab for Payroll. This is where we will embed the Salsa Payroll Run UI.
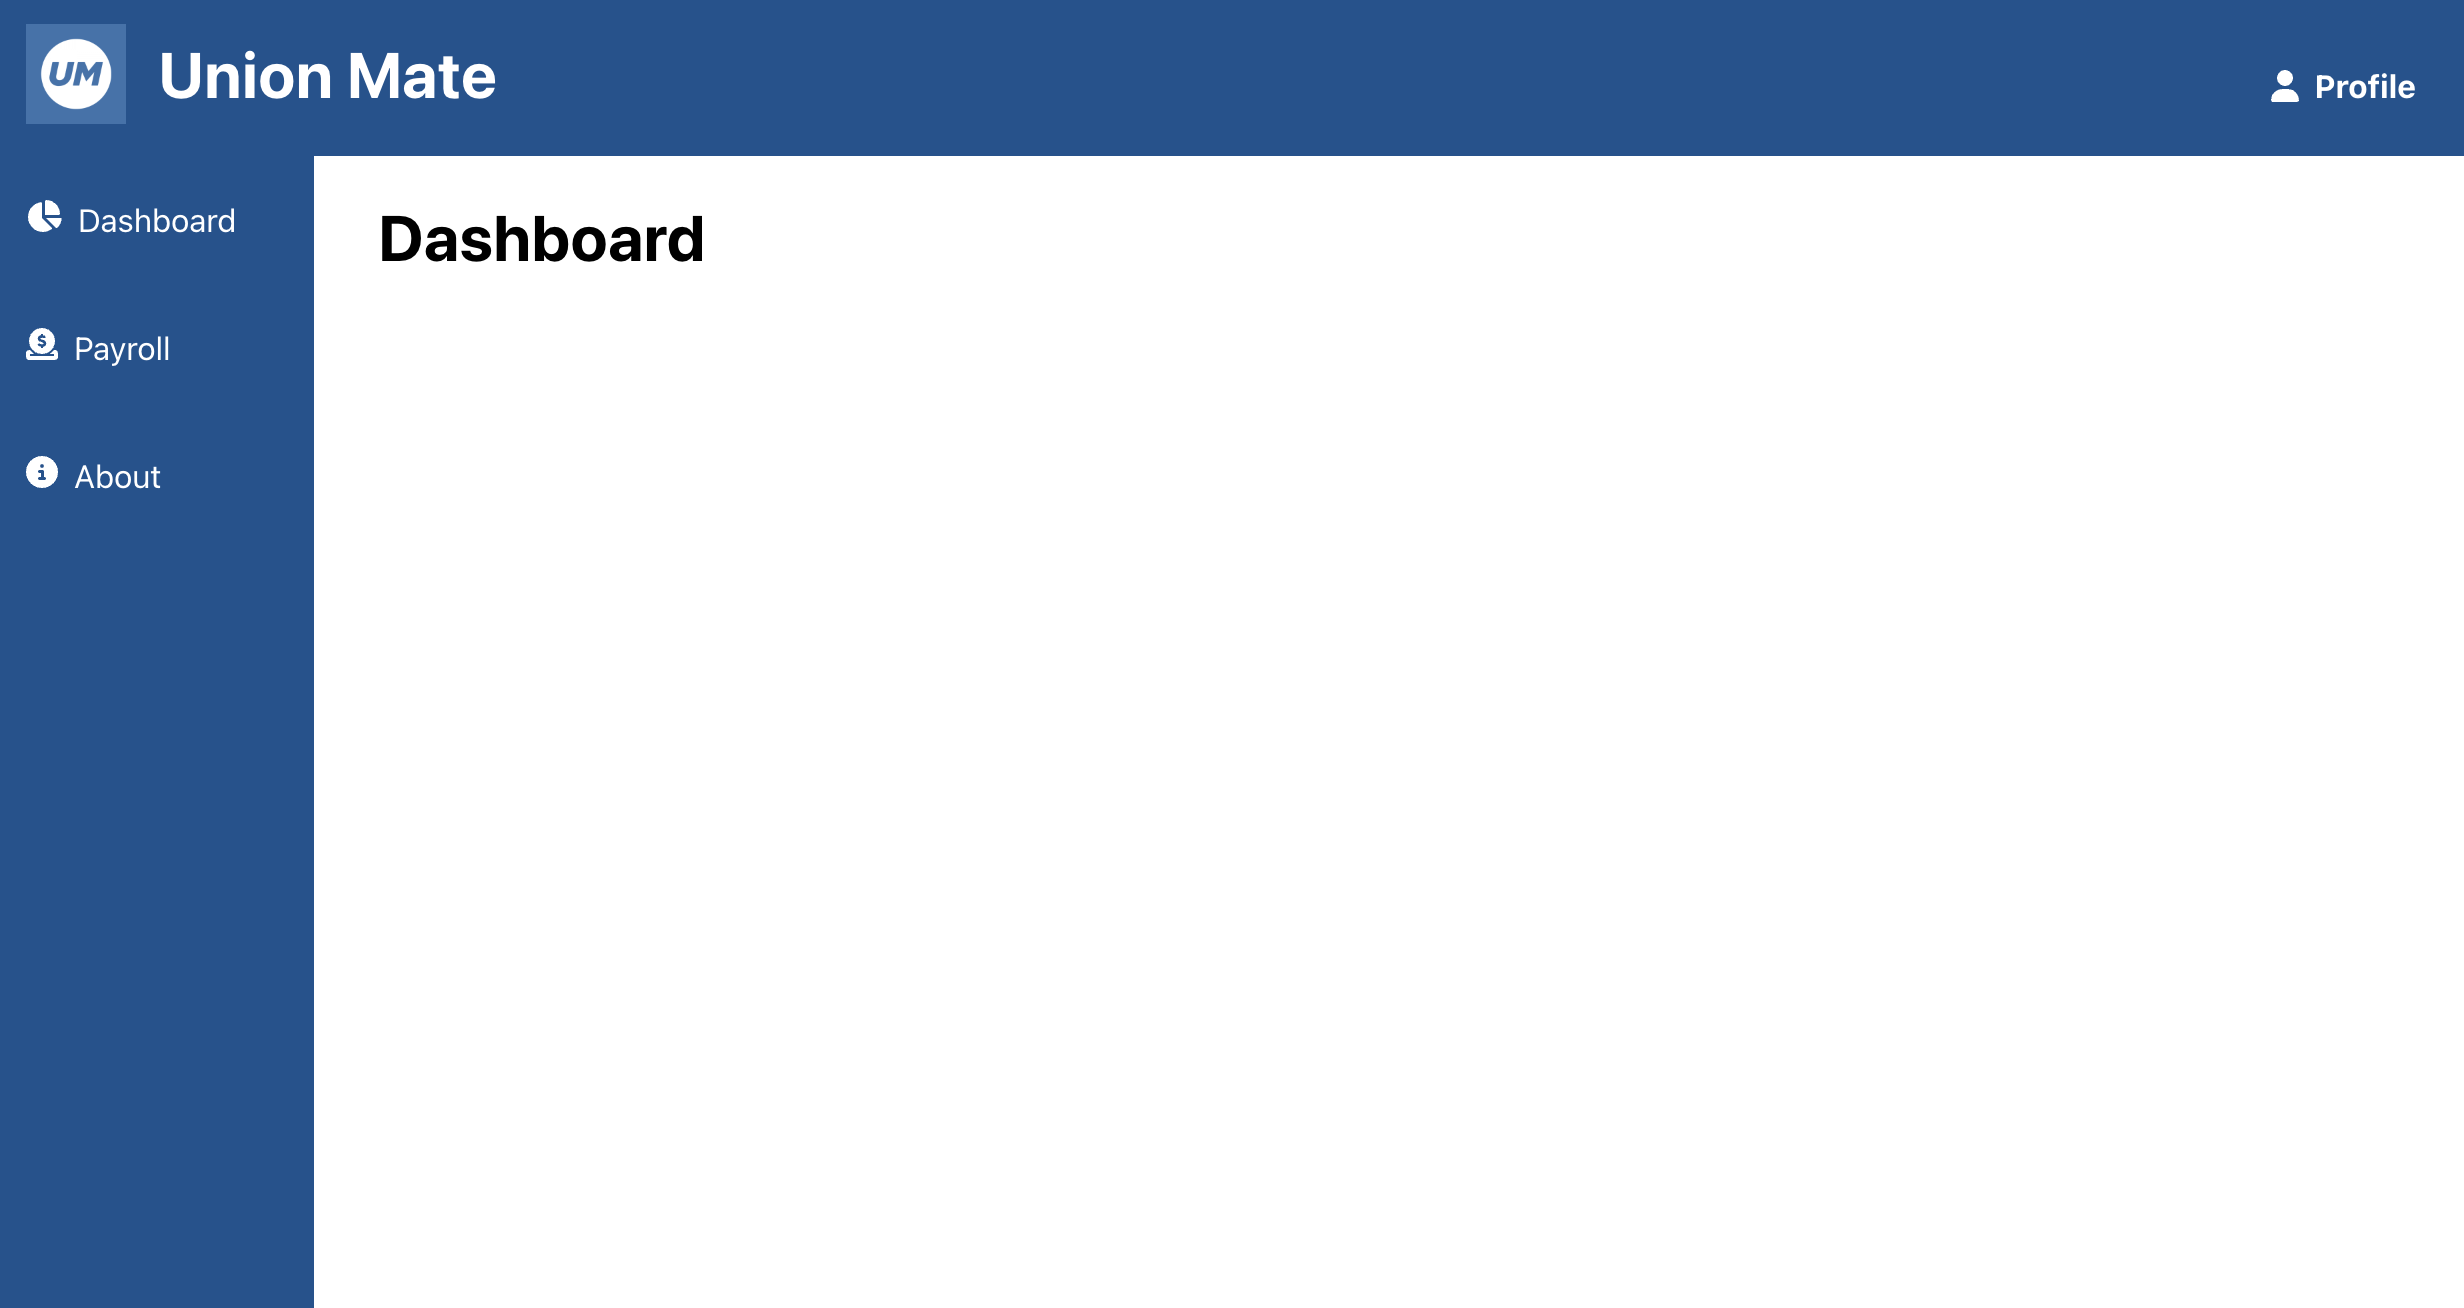
Sample app starting point
Import and initialize Salsa.js
Using your favorite code editor, open App.js, and add the following code:
import { useScript } from './hooks/useScript';

useScript('https://js.salsa.dev/v0');
const [salsa, setSalsa] = useState();
 if(window.Salsa && !salsa) {
    setSalsa(window.Salsa('my-public-client-key', {env: 'sandbox'}));
 }
This does a few things. Salsa.js is loaded from a CDN URL with useScript, then initialized. And since you are running this in the sandbox, the environment is explicitly set to sandbox. You can leave 'my-public-client-key' as is for the purposes of this tutorial. It will print a warning message to the console which you can ignore
main.72883587.js:2 Invalid client key, 'my-public-client-key'
main.72883587.js:2 No registered client for provided client key 'my-public-client-key'.
Then, pass salsa into the Router component:
<Router salsa={salsa}/>Create and mount an element
Open components/Payroll.js, and create a new element instance:
const salsaElement = salsa.elements.create('demo');Next, create a container for your UI element:
<div id='salsa-container' /> Mount your element in the container:
salsa.elements.mount(salsaElement, '#salsa-container');You should now see the Salsa demo element embedded in your application, and it should look like this:
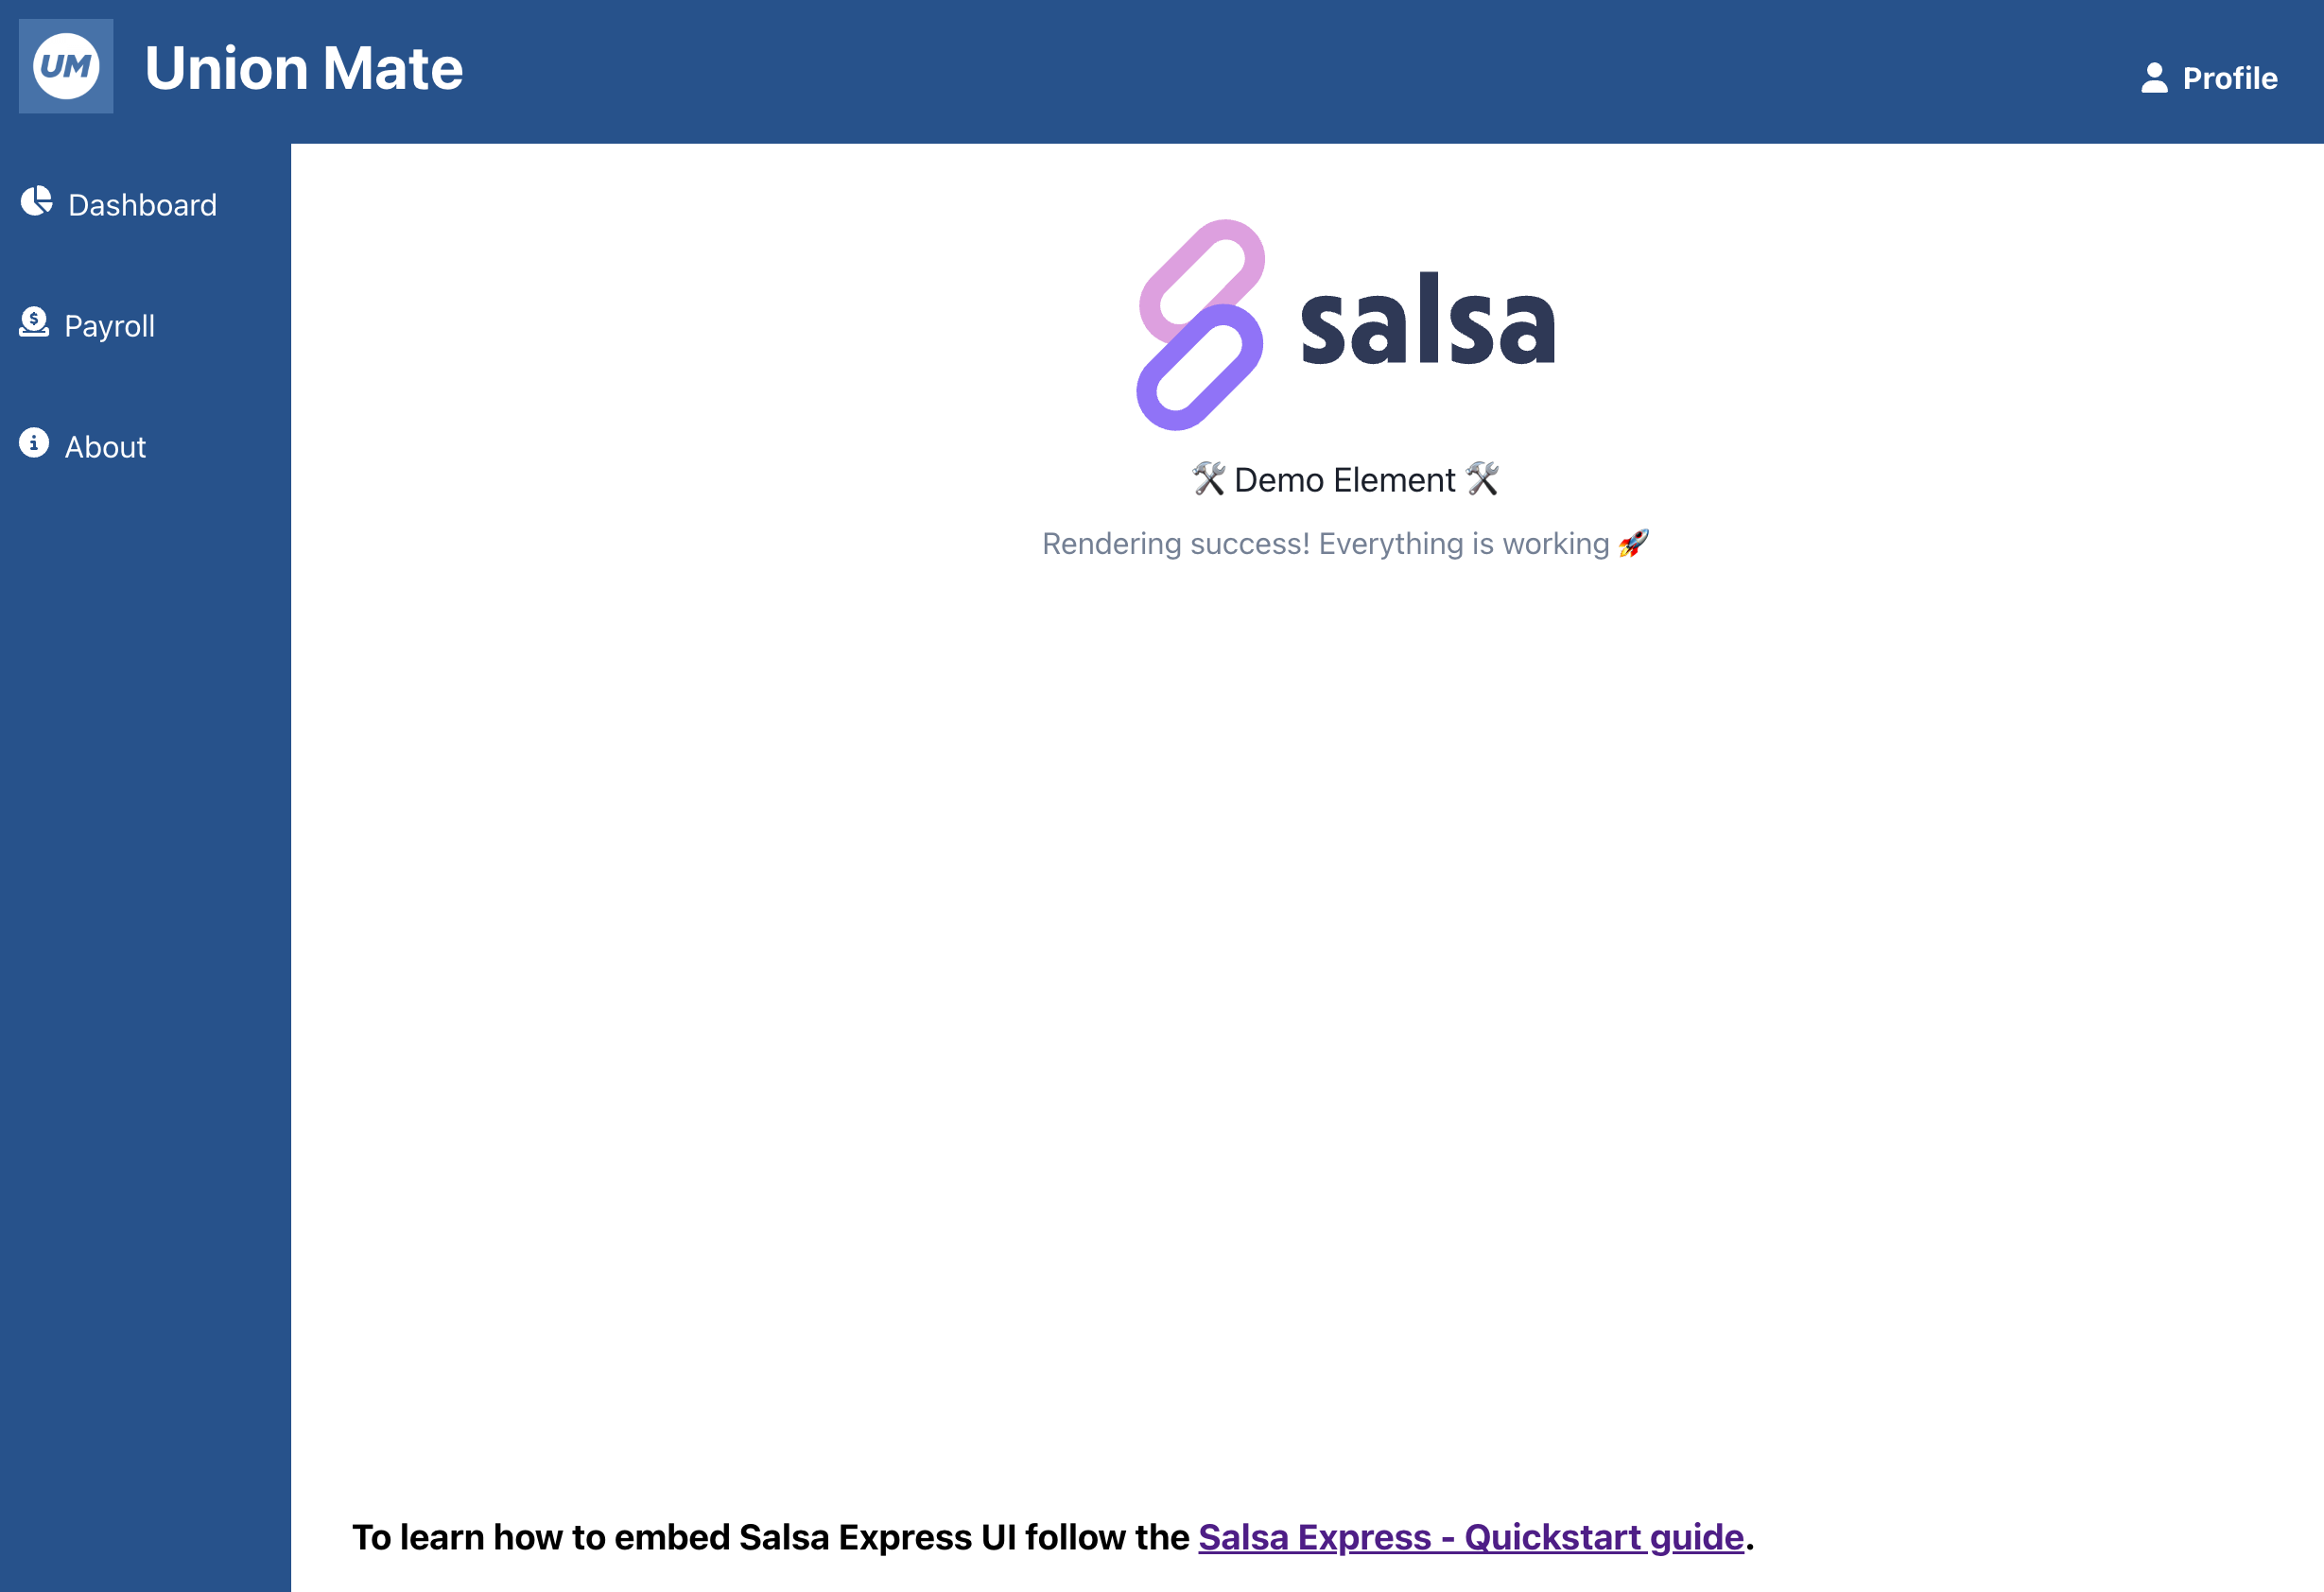
Demo element embedded successfully
Cleanup
When the view that contains the element unmounts, call the destroy function, passing in the element reference to clean it up.
salsa.elements.destroy(salsaElement);Step 3: Setup an Employer and Workers
Now that you have an element embedded in your application, the next step is to set up Employers and Workers with Salsa's APIs.
The following steps are provided as cURL requests. However, if you prefer, these requests are also available as a Postman collection.
Create an Employer
Create an Employer entity by providing basic information, such as business name, country, address, and banking details. This entity represents a business that is employing and paying Workers.
curl --request POST \
--url https://api.sandbox.salsa.dev/api/rest/v1/paystream/employers \
--header 'Accept: application/json' \
--header 'authorization: Bearer ${ADD_TOKEN}' \
--header 'content-type: application/json' \
--data '
{
    "data": [
        {
            "type": "PaystreamEmployerUpsertInput",
            "businessInfo": {
                "country": "USA",
                "businessName": "Shack 22",
                "employerType": "BUSINESS"
            },
            "addresses": [
                {
                    "name": "Main Address",
                    "addressLine1": "701 3rd St",
                    "addressLine2": "Unit 100",
                    "city": "San Francisco",
                    "state": "CA",
                    "postalCode": "94107",
                    "countryISO": "USA",
                    "isWorkLocation": true,
                    "isDefaultWorkLocation": true
                }
            ],
            "bankAccounts": [
                {
                    "displayName": "Default",
                    "routingNumber": "121000358",
                    "accountNumber": "123456789",
                    "setAsEmployerDefaultBankAccount": true,
                    "accountType": "CHECKING",
                    "paymentAuthorization": {
                        "acceptedAt": "2024-01-01T01:00:00Z"
                    },
                    "verification": {
                        "organizationVerifiedAt": "2024-01-01T01:00:00Z"
                    }
                }
            ]
        }
    ]
}
'
Example response
{
    "data": [
        {
            "id": "er_353b22d0-5d4b-4416-832e-f408de9e6d33",
            "externalId": null,
            "addresses": [
                {
                    "id": "eradr_c64cc3a8-1ab0-4d60-9b54-b095cb41bac2",
                    "externalId": null
                }
            ],
            "bankAccounts": [
                {
                    "id": "erbankacc_911a381f-aaf8-42fb-ae84-2b8839a88b99",
                    "externalId": null
                }
            ],
            "termsOfService": null,
            "minimumProjectedStartDate": null
        }
    ]
}
Save the Employer's ID (id), you will need it to complete the next steps.
Onboard the Employer
Use the mock-onboard endpoint to generate sample details, and simulate the onboarding of an Employer. Use the id from the previous step, as the employerId.
curl --location --request POST 'https://api.sandbox.salsa.dev/api/rest/v1/employers/${employerId}/mock-onboard' \
--header 'Content-Type: application/json' \
--header 'Accept: application/json' \
--header 'Authorization: Bearer ${YOUR_API_TOKEN}'
Example response
{
    "data": {
        "employer": "er_b9743f80-0b6c-44f4-b22f-8e3348b1408f",
        "readiness": {
            "workerPayment": {
                "status": "READY"
            }
        }
    }
}
See Employers API Reference for more details about onboarding employers.
Create Workers
Use the employerId from the previous step to create a Worker entity. This entity represents one employee of the business.
curl --request POST \
--url https://api.sandbox.salsa.dev/api/rest/v1/paystream/workers \
--header 'Accept: application/json' \
--header 'authorization: Bearer ${ADD_TOKEN}' \
--header 'content-type: application/json' \
--data '
{
    "data": [
        {
            "type": "PaystreamWorkerUpsertInput",
            "contract": {
                "classification": "EMPLOYEE",
                "hireDate": "2001-01-10"
            },
            "displayName": "Ruby Brown",
            "employerId": "${EMPLOYER_ID}",
            "firstName": "Ruby",
            "lastName": "Brown",
            "personalInfo": {
                "email": " [email protected]",
                "birthDate": "1989-01-07"
            }
        }
    ]
}
'
Example response
{
    "data": [
        {
            "workerId": "wr_d4779475-da76-45c9-86e1-6f1f75d9ac1e",
            "externalId": null,
            "workerContract": {
                "id": "wrctr_f27d9159-edb7-431a-8264-159c41c71385"
            },
            "bankAccount": null,
            "bankAccounts": null
        }
    ]
}
Save this worker's ID (id), you will need it to complete the next steps.
Onboard Workers
Use the following mock-onboard endpoint to generate sample details and mock the onboarding of a Worker.
curl --location --request POST 'https://api.sandbox.salsa.dev/api/rest/v1/employers/${employerId}/workers/mock-onboard' \
--header 'Content-Type: application/json' \
--header 'Accept: application/json' \
--header 'Authorization: Bearer ${YOUR_API_TOKEN}' \
--data-raw '
{
    "workerIds": [
        "${workerId}"
    ]
}'
Example response
{
    "data": [
        {
            "worker": "wr_d4779475-da76-45c9-86e1-6f1f75d9ac1e",
            "readiness": {
                "workerPayment": {
                    "status": "READY"
                }
            }
        }
    ]
}
See Workers API Reference for more details about Workers.
Step 4: Send pay data to Salsa
Paying Workers is one of the most important tasks when overseeing payroll for a business. In this section, you will learn how to send pay data from your platform to Salsa, allowing you to pay workers.
Get pay types
Pay types have been pre-configured in your Salsa account. These define the different types of pay that you support as a Partner. When creating pay entries for workers, you will use these types to categorize the type of pay the worker is receiving.
To check which pay types are configured, you can use our Retrieve all PartnerPayTypes endpoint.
curl --location --request GET 'https://api.sandbox.salsa.dev/api/rest/v1/partner-pay-types' \
--header 'Accept: application/json' \
--header 'Authorization: Bearer ${YOUR_API_TOKEN}'
Example response
{
    "data": [
        {
            "id": "prtnrpaytype_569103c1-b418-4d3f-902a-5ff3327540bc",
            "referenceId": "ref:pay:parisfintech:salarycomp",
            "name": "Salary Comp",
            "allowedAmountStrategies": ["FIXED"]
        },
        {
            "id": "prtnrpaytype_900157da-cfcd-4083-934b-cb3caa430ee2",
            "referenceId": "ref:pay:parisfintech:hourlycomp",
            "name": "Hourly Comp",
            "allowedAmountStrategies":["RATE_BASED"]
        }
    ]
}
You can read more about in our docs about the concept of Pay Types and Policies
Save the referenceId, you will need it to complete the next step.
Create pay entries for Workers
Now that you are all set up with which pay types you support, you can create worker pay entries (these represent entries of the earnings workers are to be paid). Once received, these are picked up and processed by the payroll engine to create the total Worker payment.
It's important to note that pay entries will only be picked up by the Payroll Run whose pay period overlaps with the pay entries effective interval (startDate / endDate).
Use the referenceId returned in the previous step to define the Worker Pay Entry linked to a specific Partner Pay Type.
Tip!When sending
payReferenceIdyou can use the PayTypesidorreferenceId. We recommend that you code using thereferenceIdas this will be the same across environments (Sandbox / Production) and allows you to build your integrated based on concepts and not instances.
curl --location --request POST 'https://api.sandbox.salsa.dev/api/rest/v1/paystream' \
--header 'Content-Type: application/json' \
--header 'Accept: application/json' \
--header 'Authorization: Bearer ${YOUR_API_TOKEN}' \
--data-raw '
{
    "data": [
        {
            "type": "PaystreamPayrollElementPeriodReplacementInput",
            "periodStartDate": "2024-01-01",
            "periodEndDate": "2024-01-07",
            "workers": [
                {
                    "pay": [
                        {
                            "payReferenceId": "${YOUR_FIXED_AMOUNT_PAY_REFERENCE_ID}",
                            "startDate": "2024-01-01",
                            "endDate": "2024-01-07",
                            "amount": "1500"
                        },
                        {
                            "payReferenceId": "${YOUR_HOURLY_COMPENSATION_REFERENCE_ID}",
                            "startDate": "2024-01-01",
                            "endDate": "2024-01-01",
                            "rate": "17.50",
                            "hours": "8"
                        },
                        {
                            "payReferenceId": "${YOUR_HOURLY_COMPENSATION_REFERENCE_ID}",
                            "startDate": "2024-01-02",
                            "endDate": "2024-01-02",
                            "rate": "17.50",
                            "hours": "6"
                        }
                    ],
                    "workerId": "${YOUR_WORKER_ID}"
                }
            ]
        }
    ]
}
'
Example response
{
  "data": [
    {
      "paystreamItemId": "paystream_e9d40465-096c-467c-8a36-69200afeda32",
      "partnerId": "<YOUR_PARTNER_ID>",
      "createdAt": "2024-11-07T11:07:49.073575789Z",
      "updatedAt": "2024-11-07T11:07:49.073592909Z",
      "status": "QUEUED",
      "itemInput": {
        "type": "PaystreamPayrollElementPeriodReplacementInput",
        "periodStartDate": "2024-01-01",
        "periodEndDate": "2024-01-07",
        "filters": null,
        "workers": [
          {
            "workerId": "<YOUR_WORKED_ID>",
            "pay": [
              {
                "payReferenceId": "ref:pay:parisfintech:us:salary",
                "startDate": "2024-01-01",
                "endDate": "2024-01-07",
                "amount": "1500",
                "rate": null,
                "hours": null,
                "frequency": null
              },
              {
                "payReferenceId": "ref:pay:parisfintech:us:hourly",
                "startDate": "2024-01-01",
                "endDate": "2024-01-01",
                "amount": null,
                "rate": "17.50",
                "hours": 8,
                "frequency": null
              },
              {
                "payReferenceId": "ref:pay:parisfintech:us:hourly",
                "startDate": "2024-01-02",
                "endDate": "2024-01-02",
                "amount": null,
                "rate": "17.50",
                "hours": 6,
                "frequency": null
              }
            ],
            "timeWorked": [],
            "timeOff": null
          }
        ]
      }
    }
  ]
}
You can read more about in our docs about the concept of Pay Types and Policies
Step 5: Embed the Employer Dashboard element
Create a User Token
To access the Employer, Workers, and Payroll data that you just created, you need to create a User Token with permissions to the data.
Create a User Token with the EMPLOYER_ADMIN:
curl --location 'https://api.sandbox.salsa.dev/api/rest/v1/auth/token' \
--header 'Content-Type: application/json' \
--header 'Authorization: Bearer ${YOUR_API_TOKEN}' \
--data '
{
    "role": "EMPLOYER_ADMIN",
    "employerIds": [
        "${SALSA_EMPLOYER_ID}"
    ]
}'
Example response
{
  "data": {
    "token": "$USER_TOKEN",
    "expiration": "2022-01-01T00:00:00.000+00:00"
  }
}
Load the Employer Dashboard element
Now that you've configured the resources for running payroll, you can embed the Employer Dashboard into your sample app. Open App.js and replace the demo component that you created earlier with the employer-dashboard component. This component requires both the employerId and userToken from previous steps.
const salsaElement = salsa.elements.create('employer-dashboard', {userToken: $USER_TOKEN, employerId: ${SALSA_EMPLOYER_ID});You should see the employer dashboard element embedded in your application, and it should look like this:
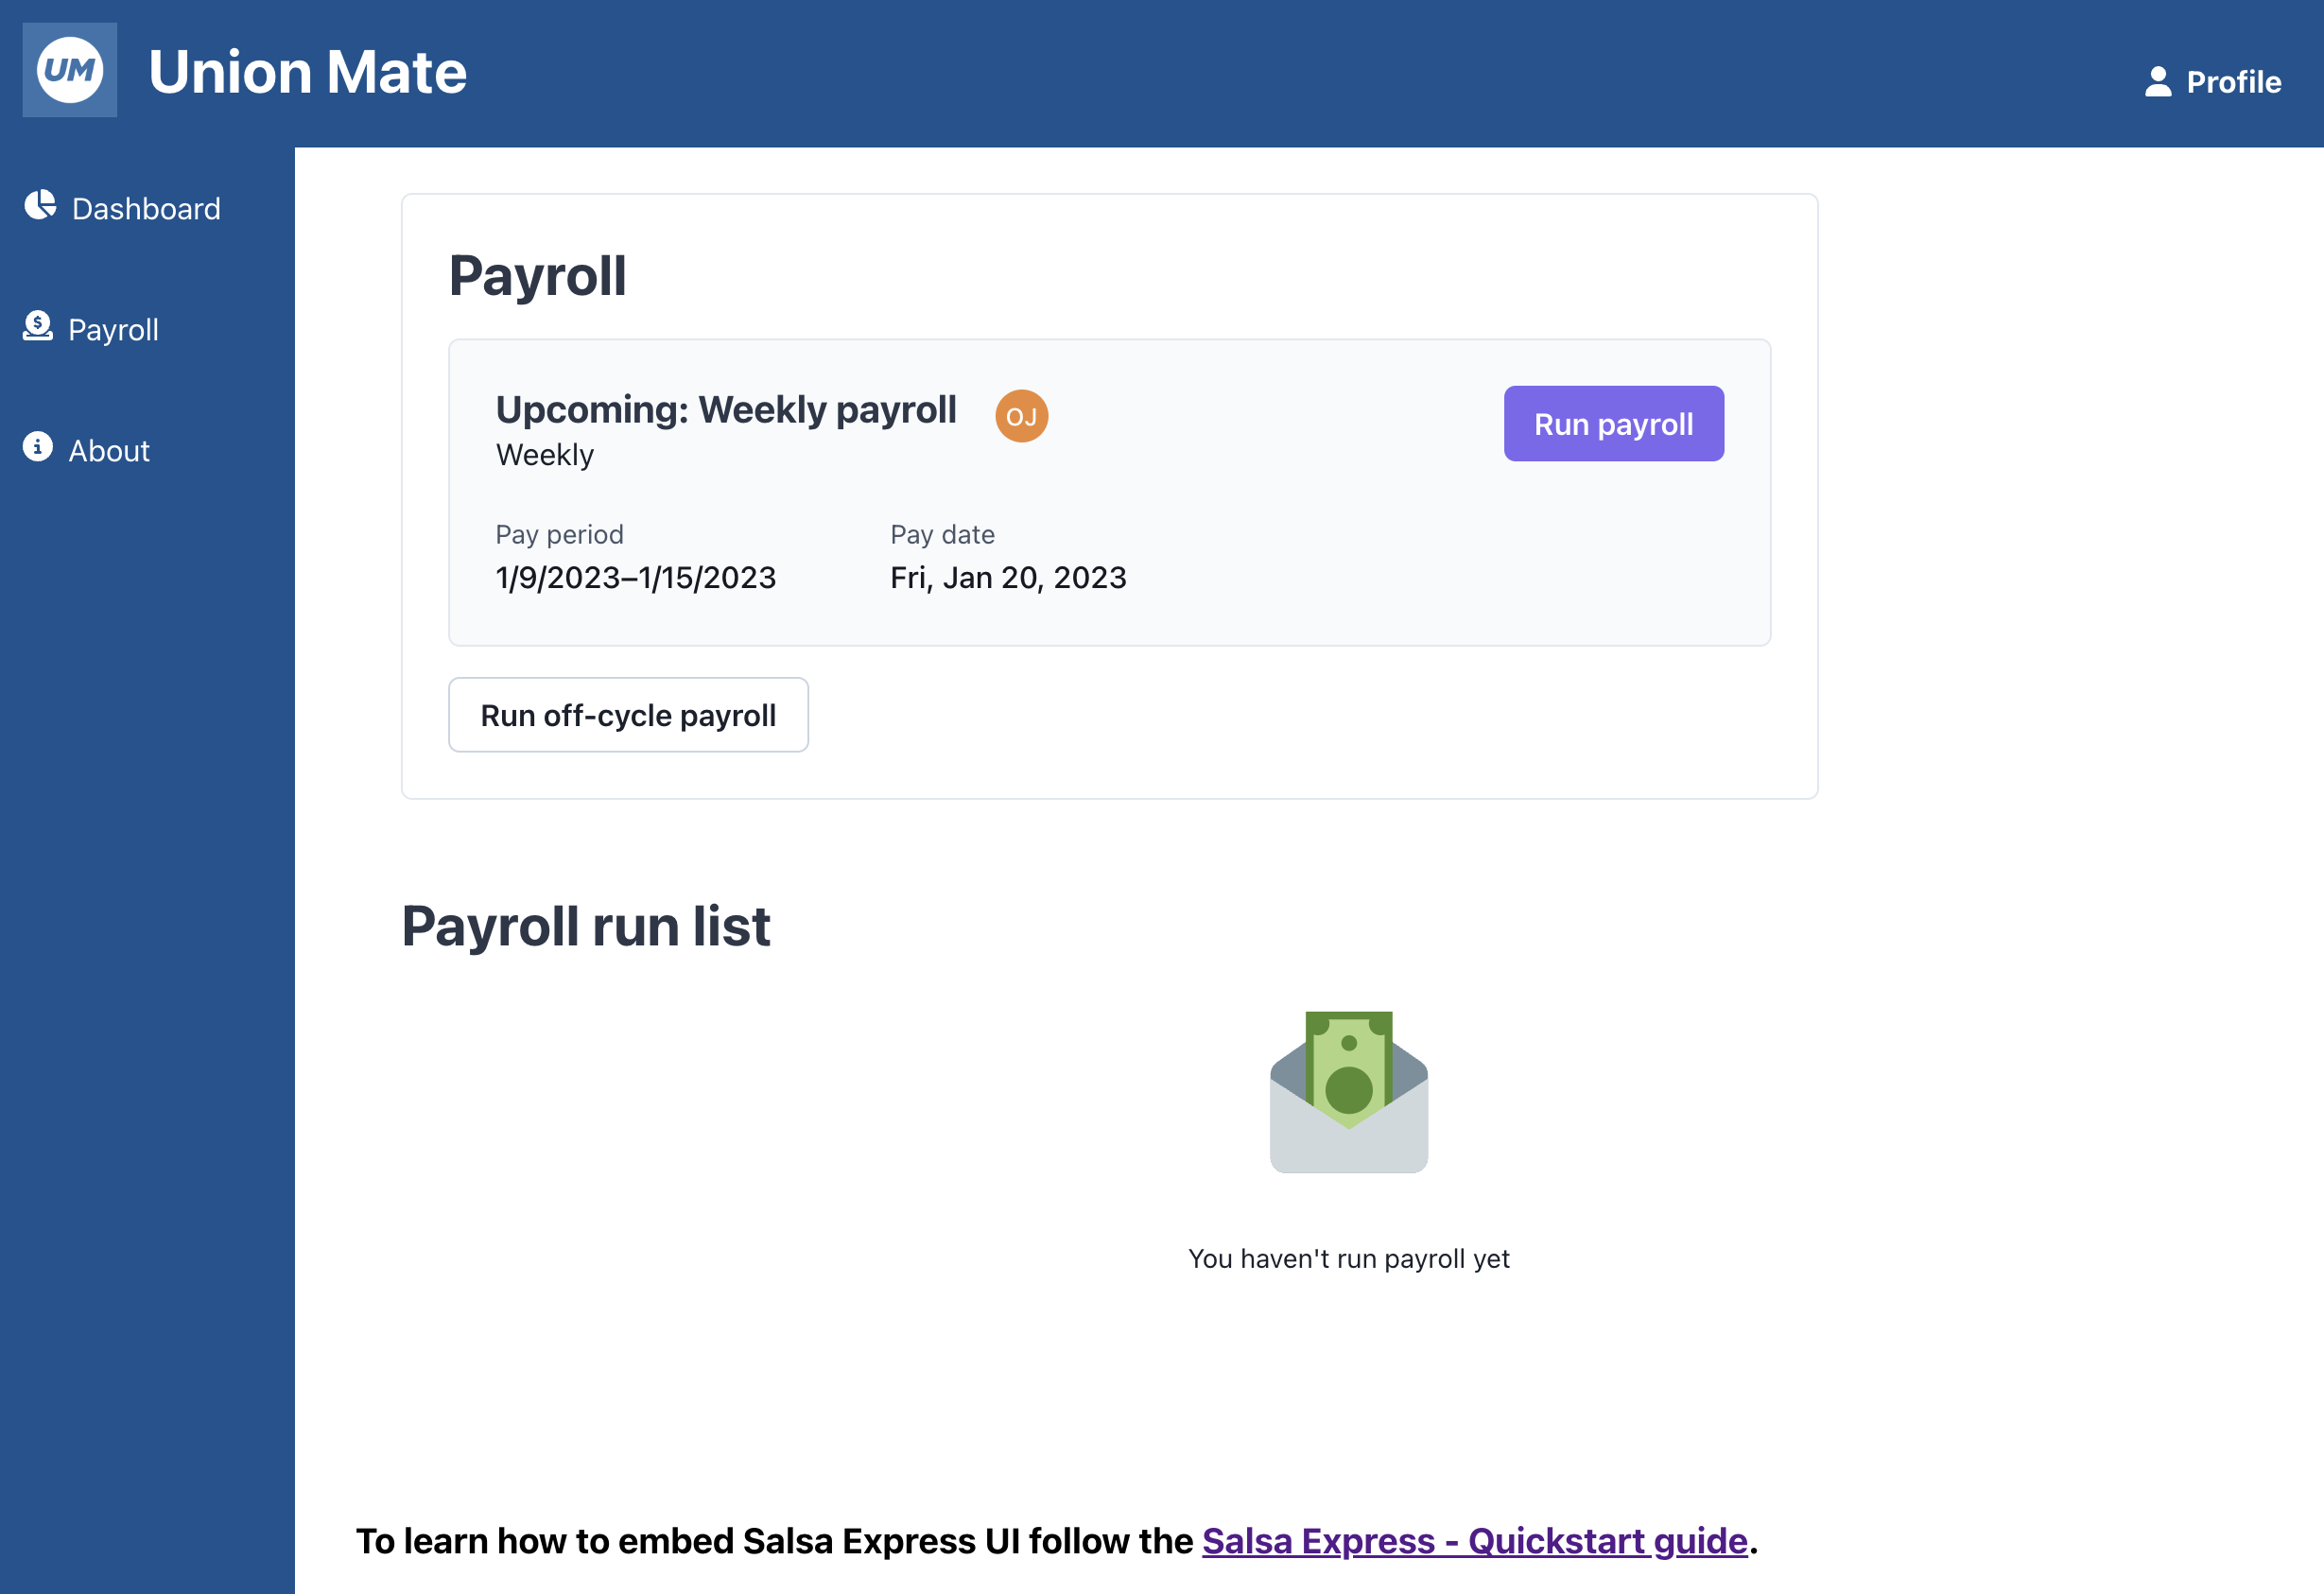
Final result: embedded employer dashboard
Updated 10 months ago